HOWTO: Daytime Running Lights Installed for $35
Enviado: 09 out 2011, 13:10
HOWTO: Daytime Running Lights Installed for $35
"There have been a couple of threads discussing adding Daytime Running Lights (DRL) to the LEAF. Some people have done it, but I haven't seen any clear documentation on how. So here's how you do it. Total cost was about $35.
STEP 1:
Get some 12V LED DRLs of your choice. I used the DTL-CW8HF from Super Bright LEDs:
http://www.superbrightleds.com/cgi-bin/ ... _specs.htm
STEP 2:
Get some wire tap connectors, I used these from Radio Shack:
http://www.radioshack.com/product/index ... Id=2104093
STEP 3:
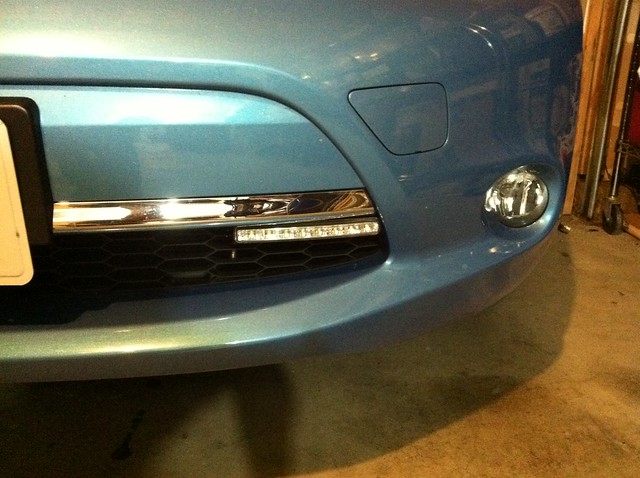
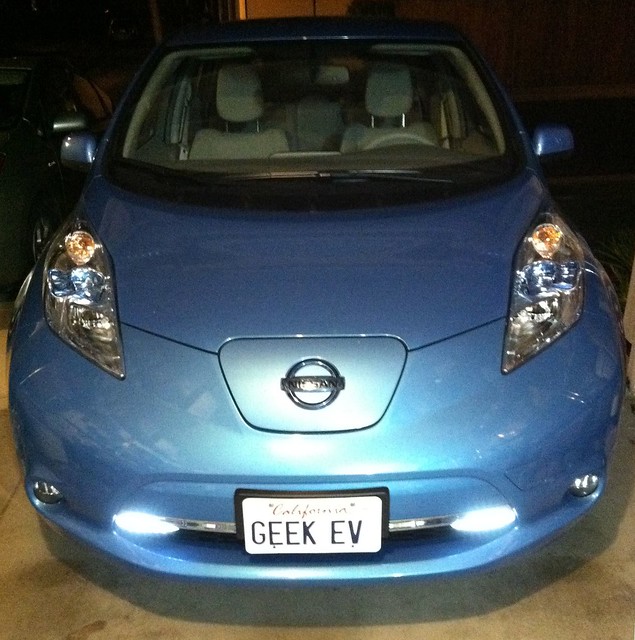
Tighten the screws on the DRLs to lock the mounting plate in a flat horizontal position and use the included double stick tape to install them in the corners under the front lip of the car.
STEP 4:
Use a 10mm socket wrench and remove the 5 bolts holding the black plastic undercarriage protector. You'll need to pull it down and slide your head and shoulders up in there to get some work done. I didn't have to remove the two clips that hold it in further back, but you may want to.
STEP 5:
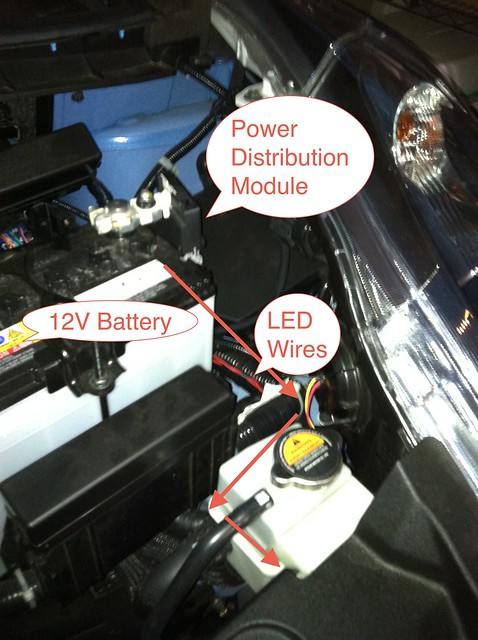
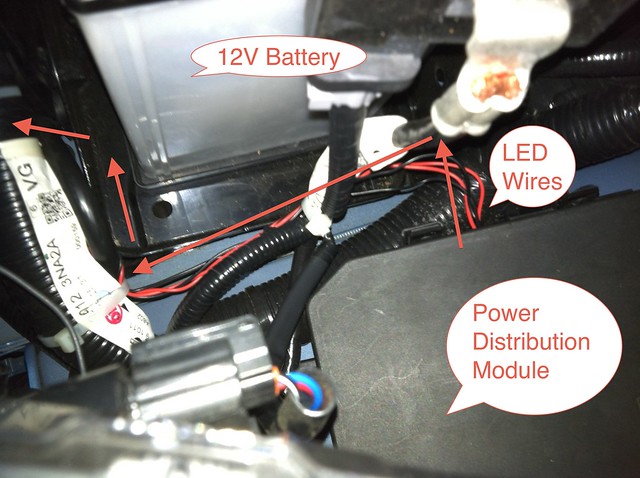
Pop the hood and locate the Power Distribution Module (PDM). As you face the motor compartment, it's on the right hand side between the 12V battery and the headlight.
STEP 6:
Release the four clips (two on each side) and carefully pull the PDM up a little bit and rotate/twist it so it's sitting vertical in the PDM well and the beveled corner is on the top facing the car.
STEP 7:
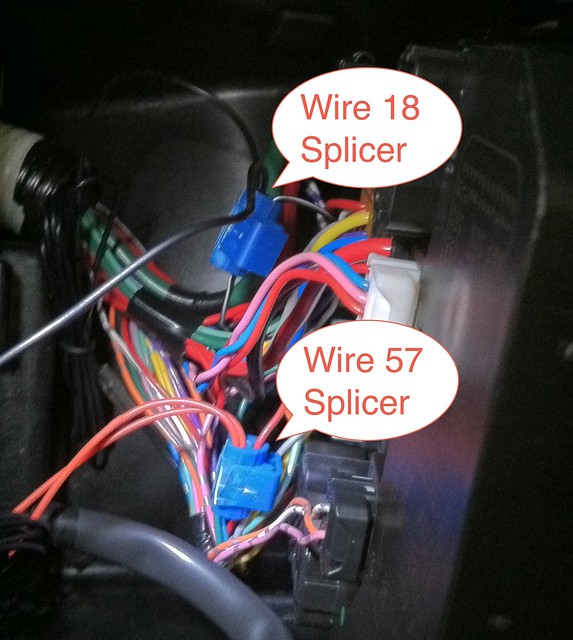
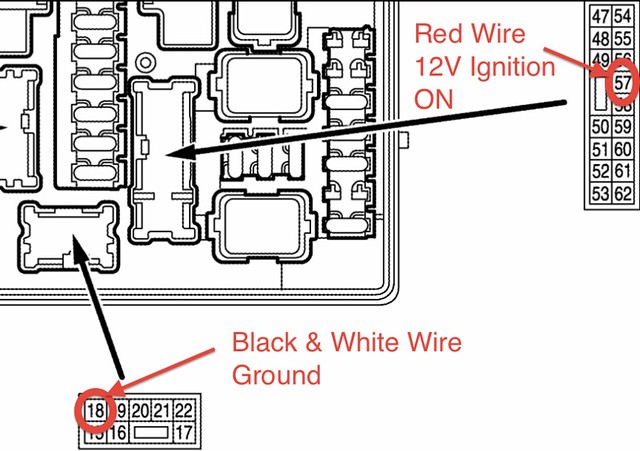
Locate the red wire #57 and the black & white wire #18. Use the wire taps you got and splice both DRL red wires to #57 and both DRL black wires to #18 as pictures above. It's a little tight in there, so I recommend a small set of pliers. Be sure the DRL wires are inserted as far as possible into the taps and that the car's wiring is properly snapped into the tap before you crimp it down. If you don't it won't make a good connection and the lights will flicker. Try to position the taps to one side of the car wires and not in the middle such that you have room to place another one if you mess it up the first time. Do not try to remove the tap if you mess up or you risk damaging the car wires - you do not want that! Just carefully clip the DRL wires off the tap and place a new tap next to it.
STEP 8:
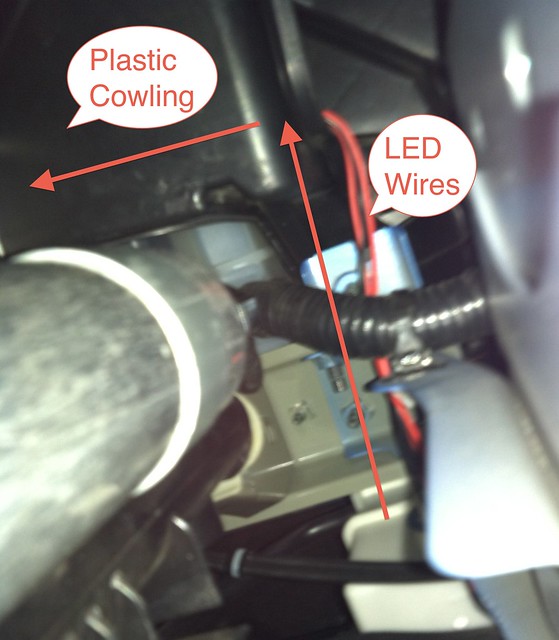
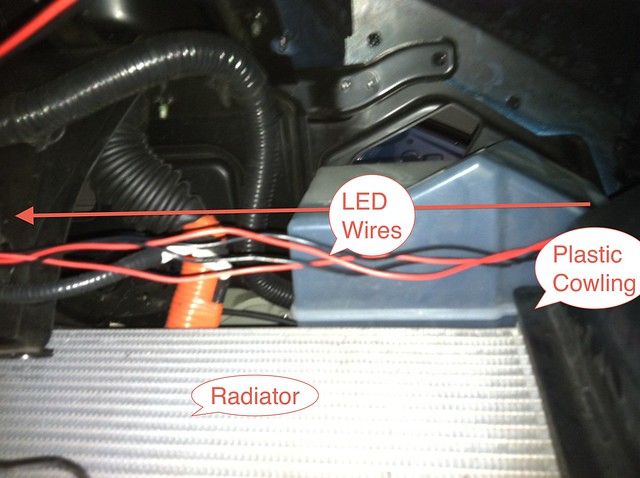
Use a file (or other tool) and cut a notch in the left side of the PDM well, run the wires through it and snap the PDM back into place. Route the wires as shown and tuck them through to the underside of the car along side the radiator. There's an opening underneath the coolant bottle that leads through along side the radiator. Of course, you can choose your own path, but here's how I did it. I found it helpful to tie the loose ends of the wires together so you can easily fish them through all together.
STEP 9:
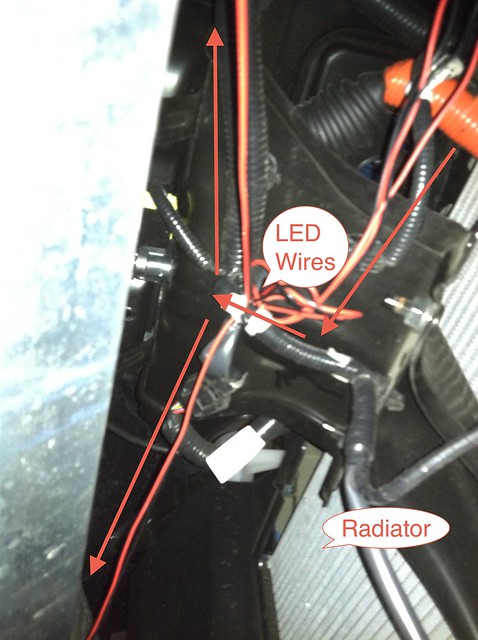
Now crawl down underneath the car an insert yourself between the bumper and the pastic piece you removed in step 3. If you managed to run the wires through the same opening I did, reach up between the side of the car and the large black plastic cowling you'll find there. Grab the wires and run them over the top of the black plastic cowling. Then run them through to the center of the car.
STEP 10:
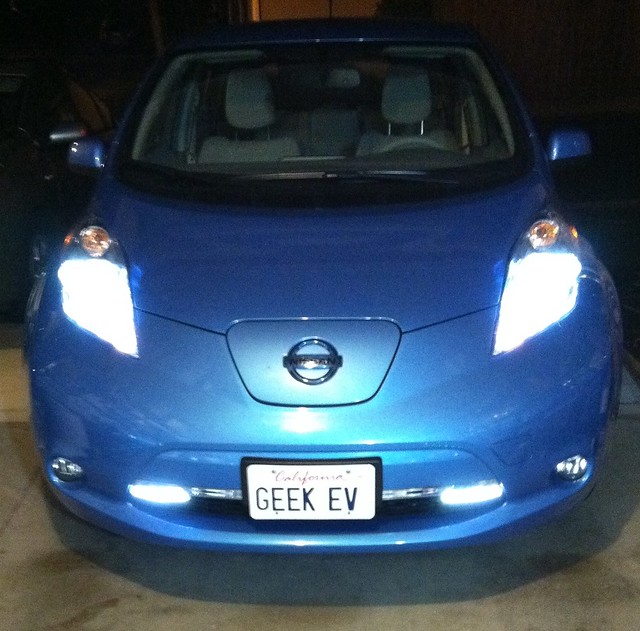
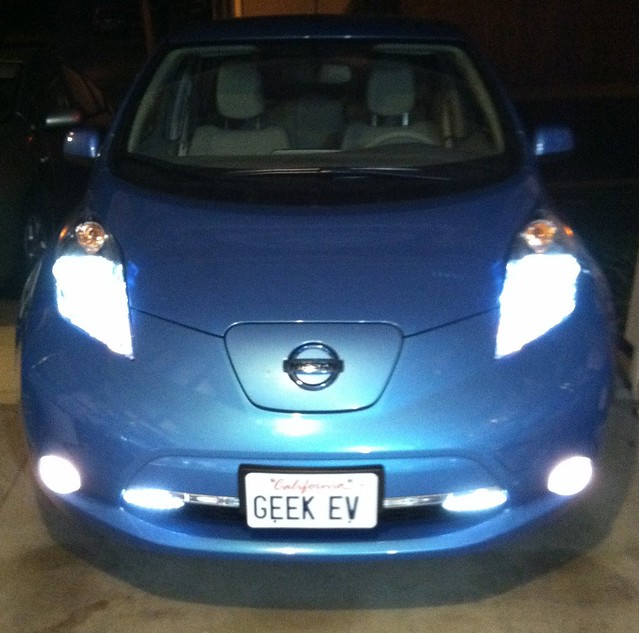
Connect the DRL wires to the DRLs and tie the wires to the wiring harness you see in the middle of the car using zip ties or the twist ties that originally held the wires together. Pull up any slack as you do it so the wires are secure and don't flap around.
That's it - you're done!
Any questions?"
Em: http://www.mynissanleaf.com/viewtopic.php?f=37&t=6134
"There have been a couple of threads discussing adding Daytime Running Lights (DRL) to the LEAF. Some people have done it, but I haven't seen any clear documentation on how. So here's how you do it. Total cost was about $35.
STEP 1:
Get some 12V LED DRLs of your choice. I used the DTL-CW8HF from Super Bright LEDs:
http://www.superbrightleds.com/cgi-bin/ ... _specs.htm
STEP 2:
Get some wire tap connectors, I used these from Radio Shack:
http://www.radioshack.com/product/index ... Id=2104093
STEP 3:
Tighten the screws on the DRLs to lock the mounting plate in a flat horizontal position and use the included double stick tape to install them in the corners under the front lip of the car.
STEP 4:
Use a 10mm socket wrench and remove the 5 bolts holding the black plastic undercarriage protector. You'll need to pull it down and slide your head and shoulders up in there to get some work done. I didn't have to remove the two clips that hold it in further back, but you may want to.
STEP 5:
Pop the hood and locate the Power Distribution Module (PDM). As you face the motor compartment, it's on the right hand side between the 12V battery and the headlight.
STEP 6:
Release the four clips (two on each side) and carefully pull the PDM up a little bit and rotate/twist it so it's sitting vertical in the PDM well and the beveled corner is on the top facing the car.
STEP 7:
Locate the red wire #57 and the black & white wire #18. Use the wire taps you got and splice both DRL red wires to #57 and both DRL black wires to #18 as pictures above. It's a little tight in there, so I recommend a small set of pliers. Be sure the DRL wires are inserted as far as possible into the taps and that the car's wiring is properly snapped into the tap before you crimp it down. If you don't it won't make a good connection and the lights will flicker. Try to position the taps to one side of the car wires and not in the middle such that you have room to place another one if you mess it up the first time. Do not try to remove the tap if you mess up or you risk damaging the car wires - you do not want that! Just carefully clip the DRL wires off the tap and place a new tap next to it.
STEP 8:
Use a file (or other tool) and cut a notch in the left side of the PDM well, run the wires through it and snap the PDM back into place. Route the wires as shown and tuck them through to the underside of the car along side the radiator. There's an opening underneath the coolant bottle that leads through along side the radiator. Of course, you can choose your own path, but here's how I did it. I found it helpful to tie the loose ends of the wires together so you can easily fish them through all together.
STEP 9:
Now crawl down underneath the car an insert yourself between the bumper and the pastic piece you removed in step 3. If you managed to run the wires through the same opening I did, reach up between the side of the car and the large black plastic cowling you'll find there. Grab the wires and run them over the top of the black plastic cowling. Then run them through to the center of the car.
STEP 10:
Connect the DRL wires to the DRLs and tie the wires to the wiring harness you see in the middle of the car using zip ties or the twist ties that originally held the wires together. Pull up any slack as you do it so the wires are secure and don't flap around.
That's it - you're done!
Any questions?"
Em: http://www.mynissanleaf.com/viewtopic.php?f=37&t=6134